
Well, after so many interruptions with this restoration from building work and fitting a new kitchen to moving my parents into a bungalow and also getting side tracked with other exotic Norton's, the 16H comes alive at last 
I stripped it apart on 18th Jan 2011 and I was aiming to finish it in April 2012...! Where did that extra years go..? 
Here's a video of it being booted up, standing on the bench and starting it probably isn't the best thing to do  . Sunday will be the first ride out so fingers crossed
email (option): horror@blueyonder.co.uk
Well done Dave. Just in time to get some running in done before Normandy. See you there. Ron
email (option): ronpier@talk21.com
Happy days Dave
Nice one
:-)
Jo'b
email (option): Jonnyob1@googlemail.com
Nice one.
Good thing you moved those spanners, they were making for the door.
email (option): spacemonkeym@gmail.com
I had no doubt your Norton shouldn't run Horror! Well done!
Is it a tight adjustment or did you forget your kickstart return spring?
Regards,
Sven
email (option): snvosselman@gmail.com
'It's Alive! '...Another Norton for 2014...I love that first start up after years in bits...Ian
email (option): ian@wright52.plus.com
Thanks people
It's a bit tight on the kickstart Sven, there's a new fibre seal in there and the bush in the kickstart shaft is a bit tighter than I'd like but a pig to get at. I'm hoping it will "bed-in" with gentle running and be ok when it's hot. I also think I haven't wound the spring up enough, but as long as it's not flopping about it will be fine. If it's still tight after a run I'll take the end cover off.
The only things to finish off are fit the pillion seat and I have a new exhaust to go on, although the one I've got looks to be original and fits perfectly and is in great condition except no dull chrome left, the new one has a slightly fatter silencer so it may touch the kickstarter.
email (option): horror@blueyonder.co.uk
Yes Ian, a great feeling and relief to see the oil indicator is up and the oil is returning.
Todays test ride went well with only adjustment to tickover and clutch cable needed. I rode to 2 friends houses so a couple of miles between stops which has bedded in the kickstart bush nicely without over heating it. It looks like I haven't wound the spring up enough but that's not a problem. When I got back after about 7 miles everything was settling in nicely, so I'm a very happy man.
I'll check the oil tomorrow and see if there's any shinny metal bits in it.
Here's a few pictures


email (option): horror@blueyonder.co.uk
A grand bike that dave, well done to you
:-)
email (option): Jonnyob1@googlemail.com
Very nice, Mr.H. Don't forget your downpipe clamps though !
I predict that the overhead camshaft nonsense won't be with you for long now that you've discovered the true way.
Yes Rik, there's a couple of finishing off touches I need to do, but wanted to road test it asap
Also, in my excitement I've forgotten to thank you Rik, Ron and Rob VDB for your help with info, photos and measurements I've needed, and to Henk, Ian and the people on here for advice and parts. Cheers JoB for my rear seat and cover and Jan for making me stuff
email (option): horror@blueyonder.co.uk
Overhead camshafts... it's just a phase, it'll never catch on
email (option): horror@blueyonder.co.uk
Nice one Horror, what make of tyres have you fitted?
They look good.
Cheers, Mick.
email (option): mick@motorbikemike.org.uk
Hi Mick, they're Mitas Speedway tyres 3.75 they've got the same tread pattern as the Matchless forum picture and I think they look good too
email (option): horror@blueyonder.co.uk
Awesome bike! What a feeling when they first roar to life!
The bike looks superb! nice job.
Hi Horror...Just a thought..have you got a 'before' picture?....Ian
email (option): ian@wright52.plus.com
Fabulous job Horror-to me there's no better sound in the world than a Norton 16H and a Triumph 5T start up.....well except for the shriek of my baby girl when I first took her in my arms, that is!!!
Thanks Hank
Here ya go Ian


email (option): horror@blueyonder.co.uk
Hi Horror...That looks like a pretty sound bike, and pretty complete, though I have no illusions about how much time and hard work was required to turn it into its latest incarnation..What was it like mechanically?....Ian
email (option): ian@wright52.plus.com
Nice one Dave!,
Glad to see some of my parts on there too, only dont like the horn, but that's rivet counting on my side, hope it will give you years of pleasure!.
Cheers,
Lex
email (option): welbike@welbike.net
Hi Ian, the engine internals weren't bad, the barrels have been re-sleeved back to standard bore at some time. I changed the main bearings, crank pin, valves and guides, and lapped in the oil pump. The worse parts were the crank cases that had been worn away by the engine plates being loose then tightening etc etc. Each mounting lug needed to be welded up and machined back to size.
The front mudguard was M20, headlight was MU42 and the rear mudguard was rotten. So all the back end had to be made up.
The gearbox top mount was broken and welded and it had all new bearings, bushes seals etc and a 93thou gap to shim up some how.
Any other bearings on the bike were changed. The painting and paint was a nightmare and took up far too much time and money.
The more you get into it the more you find out things aren't right and you have to have the correct one.
Now it looks like I need a new horn Thanks for your parts too Lex What does the right horn look like..?
Oh, I also need the correct rear brake rod with the front adjuster if anyone has one please
email (option): horror@blueyonder.co.uk
Thanks for your parts too Lex What does the right horn look like..?That's how the right horn (Lucas HF.1235) looks like...

Congratulations on your restoration!
email (option): ferrarakias@hotmail.com
Do I see tie-wraps on your bike Kostas...........???????
Regards,
Sven
email (option): snvosselman@gmail.com
Thanks Kostas. I guess I'm on the look out for one now, or Lex wont speak to me any more If there's anything else that looks out of place on my bike I wont be upset if someone tells me
I stayed away from plastic cable ties and used rubber ones instead, it seemed more in keeping with the bike.... and if you get it wrong everyone lets you know
email (option): horror@blueyonder.co.uk
What a lovely looking and sounding motorcycle, great job Horror
email (option): kitharvey247@hotmail.com
Regards,
Sven
 I hoped no one would notice!
email (option): ferrarakias@hotmail.com
Ha ha! Just kidding Kostas!
Rather a tie-wrapped running Norton than an 'original' non-runner somewhere in the corner of a shed...
As Norton only used steel cable holders and because they very hard to find (almost no one seems to have them), perhaps we must collect our needs in order to have a few batches produced.
Good idea?
Regards,
Sven
email (option): snvosselman@gmail.com
As Norton only used steel cable holders and because they very hard to find (almost no one seems to have them), perhaps we must collect our needs in order to have a few batches produced.
Good idea?
Regards,
Sven
Sven, when I go that direction again, I'll show the spring factory my sample clip, see what they can do, of making a batch, think there are 3 or 4 needed on one bike? (more on the B4, as they are used on the sidecar aswell)
Cheers,
Lex
email (option): welbike@welbike.net
Sheesh! Dave - She's a real beaut!You have to be proud of something like this....
Spotted a featherbed in the background in one of your pics!
Thanks from me for the input that you've provided w.r.t. my Domi 88.
Cheers - and enjoy riding her!
Bruce
email (option): brucekirby@telkomsa.net
Thanks Bruce, no problem with anything I can do to help with your 88 rebuild
Hi Sven & Lex, I did try to make the big sprung steel cable strap that goes under the tank to hold the main loom, but after I'd done it I thought it was a bit pointless as you can't see it under there. I did use the ones that go around the rear mudguard to hold the lighting wires. I had some in a box of 40's Norton bits that were a bit rusty, but Dragonfly sell them and they tidy up the wiring nicely. Otherwise I'd be cable tying it to the mudguard stays. What other ones are there..?

Note to Lex, I'm sorting out a horn as quick as I can. The one I've seen has Lucas Altette on it and I can't see writing on Kostas horn, but otherwise looks to be the same. I could fill in the writing before spraying..? I've also ordered the correct looking horn button  I wasn't pleased with the aftermarket one that was on it and the original Norton button I've got is for 7/8ths bars and wouldn't fit
email (option): horror@blueyonder.co.uk
These are all the wiring clips required...

As far as I know WD Altettes had no markings (LUCAS ALTETTE) on the bezel, hope someone knows more..
email (option): ferrarakias@hotmail.com
Kostas, you are missing one type, the 3 big ones under the tank, and the rear one can be seen on the B4 at least:


That's the one, I'd like to get made.
Lex
email (option): welbike@welbike.net
I know about the ones under the tank and the rear mudguard, but where do all the others go..? There's hardly and wiring on the bike.
email (option): horror@blueyonder.co.uk
Top 3 are all the same, one is for dipswitch wires, another for the regulator wires, bottom left for horn wires if I see it right?
Lex
email (option): welbike@welbike.net
I'm sorting out a horn as quick as I can. The one I've seen has Lucas Altette on it and I can't see writing on Kostas horn, but otherwise looks to be the same. I could fill in the writing before spraying..? I've also ordered the correct looking horn button
I wasn't pleased with the aftermarket one that was on it and the original Norton button I've got is for 7/8ths bars and wouldn't fit The 'Altette' marking on the bezel indicates that it was sold as a spare part - they didn't mark the horns fitted as original equipment (according to Taff).
You obviously don't want an alloy bezel and you need to avoid the 'cutaway' on the rear of the body as per your present one which indicates post-war, and you need fillister head screws rather than acorn nuts.
Thanks for that Lex, you can buy metal clips for the handlebars that may fit the regulator wire as well. Were they painted black?
Ah thanks Rik, all the ones on ebay have writing on so I'm guessing there's a lot of spare rims about. I'd be happy with one the right shape, I can easily fill in the writing. I googled the Lucas part number in "images" and one picture took me to the WD BSA website where it shows some horns
Thanks for everyones help
email (option): horror@blueyonder.co.uk
Hello Dave,
A very nice piece of TLC so to say.
Could you send the pictures to my email.
I am also not sure I got you in my files.
Would you mind sharing your F and E numbers?
Cheers,
Rob
email (option): WD16H@telfort.nl
I seem to be having trouble sending you the pictures Rob, I'll send 1 at a time.
Here's the bike with the new exhaust fitted

email (option): horror@blueyonder.co.uk
And the sun is finally shining! Great job!
See you in Normandy next year!
Regards,
Sven
Here's the bike with the new exhaust fitted
That's much more like it! What's the silencer's finish?
email (option): ferrarakias@hotmail.com
Thanks Kostas, It's a bright chrome exhaust that I blasted enough to take the shine off but not enough to go through the chrome. A tip Ron gave me
I've changed the horn button for the right one but still haven't found a horn. Pillion seat still needs to be fitted. But at the moment I'm doing a few miles and setting it up
email (option): horror@blueyonder.co.uk
Kostas is right. Much nicer with the dull silver exhaust. Glad to see that the stand is looking nice and black.
How's the beast running ?
email (option): 79x100@gmail.com
It's the slowest bike I've ever ridden Rik
I advanced the timing a bit and I think it's a bit better. After 50 miles the oil bath has just sprung a leak and is now living up to it's name
But it starts and runs well up to 40mph and it's great fun. The plug is looking very clean and I was worried it was running lean but a quick check with the choke lever says it doesn't like it richer. I guess it really is just that slow, but I don't want to push it. Welcome to the world of side valves...!
Next year it'll have a Model 18 engine in it
email (option): horror@blueyonder.co.uk
Give it time to loosen, H. It really shouldn't be that slow. Mine flies up to an indicated 60 mph and the limiting factor then is my faith in the brakes.
It probably is one of the slowest Nortons but it'll out-handle a Jubilee...You're not a heavy bloke so ultimately yours should be about half as fast again.
email (option): 79x100@gmail.com
Now there's the perfect quote for a T shirt
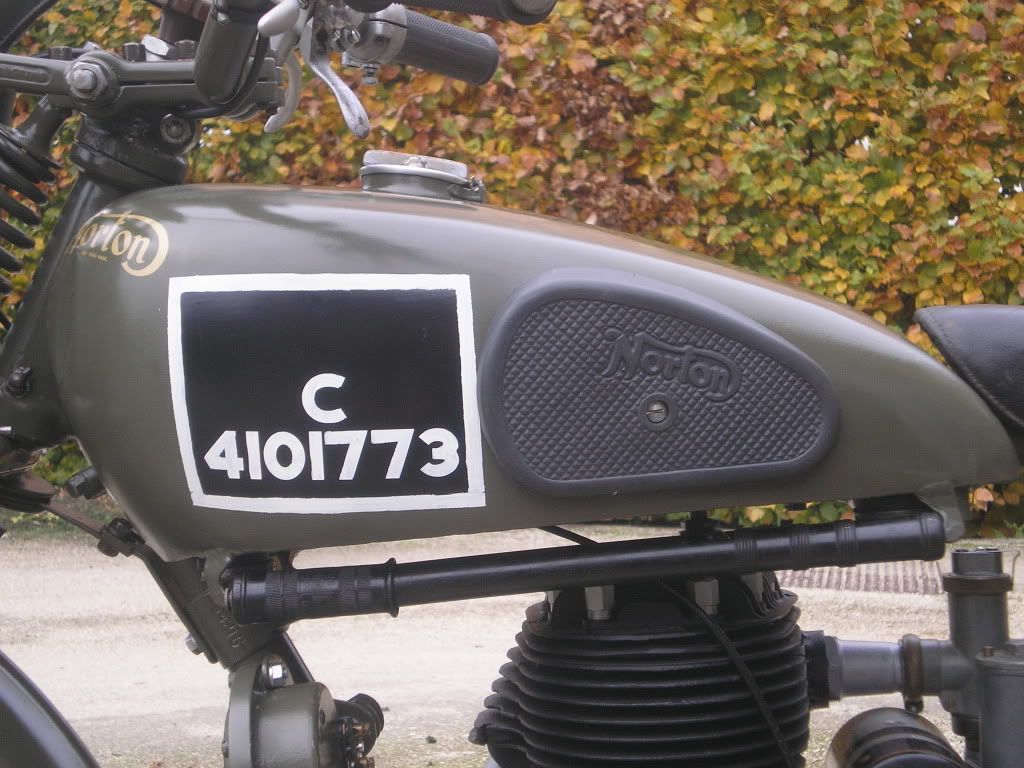
Dave its looking great, but is the tank a little high at the back?
Rob
email (option): robmiller11@yahoo.co.uk
Actually it does handle well. I was throwing it around down the country lane to my mates place. On my Harley I'm nearly in the hedge
So maybe another T-shirt quote.
It seems to slow down when it gets hot which is worrying, maybe just needs to loosen up.
Hi Rob, yes the tank does look low at the front in the pictures and I don't know why. It is on the thinnest of tank rubbers the same front and back. Maybe it needs bigger ones on the front..?
email (option): horror@blueyonder.co.uk
It could be worse Horror, you might have bought a BSA...according to the Norton men the 16H is much faster than the M20... ...Ian
email (option): ian@wright52.plus.com
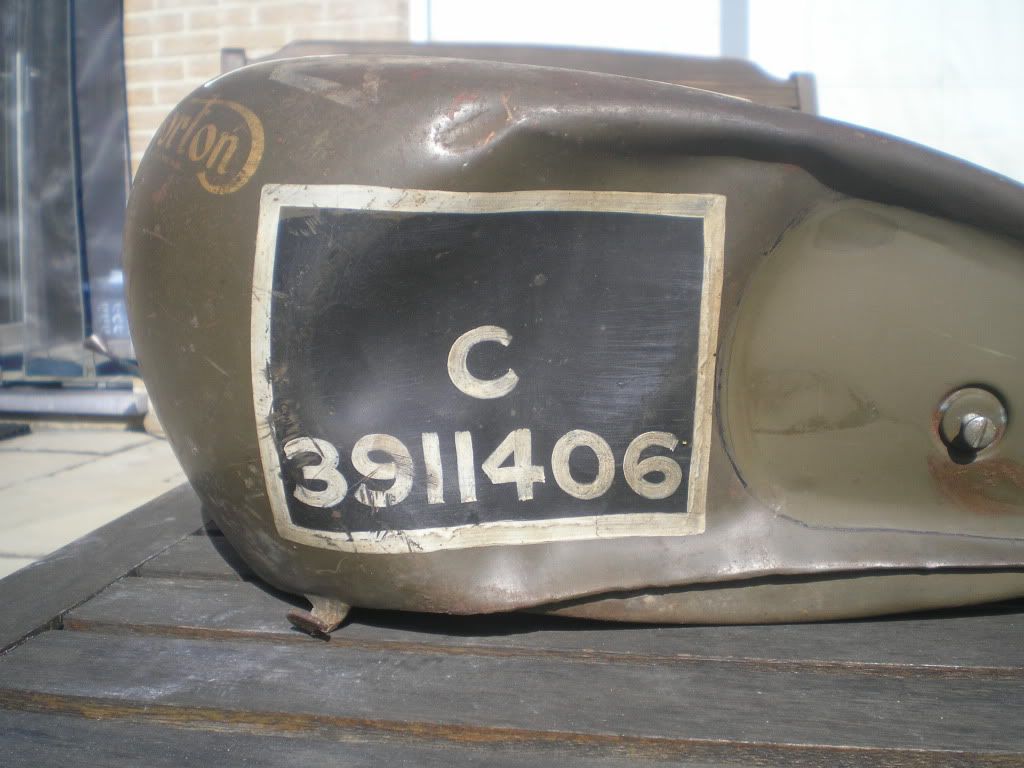
Regarding the tank! For a long time I have noticed that most 16H tank C numbers a sloping. It's because like me, the C number is applied before the tank is fitted to the bike and the stencil is put on in a parallel position to the bottom of the tank, which slopes when fitted to the bike. Ron

email (option): ronpier@talk21.com
Ron, I think that you've hit the nail on the head. I was lucky as I had an original black panel to copy and it wasn't until I started measuring that I realised the obvious - the bottom edge of the tank cannot be taken as a datum.
email (option): 79x100@gmail.com
Thats usefull information for when I paint the numbers on my big4 tank
And the fact that Daves 16H is on the rear stand must have exaggerated it.
Rob
email (option): robmiller11@yahoo.co.uk
I spent ages positioning the stencil on the tank and I used lots of pictures to help me do it. The main one being the 1942 WD training film. which shows the C number parallel with the bottom of the tank.

Also pictures that Rik sent me and ones I'd saved from the internet.


I hadn't realised the tank sloped down until looking at these pictures of my bike, but as Rob says it being on the stand doesn't help nor the fact that the front fork spring looks a bit soft by the angle of the fork links, as they should be nearer horizontal. So although it doesn't look straight it is correct as per the original pictures..?
Also I must say my numbers look bigger now, but in real life aren't very big. Which also shows how deceiving pictures can be. I've probably done them slightly too large.
email (option): horror@blueyonder.co.uk
And the fact that Daves 16H is on the rear stand must have exaggerated it.
Rob
It's the same thing with Big 4's Rob. Unless painted with the black box like Rik's bike they are also sloping numbers. Of course lots of them with the BEF weren't numbered. But especially those with the airborne forces had the sloping number on. Ron

email (option): ronpier@talk21.com
And the fact that Daves 16H is on the rear stand must have exaggerated it.
Rob
It's the same thing with Big 4's Rob. Unless painted with the black box like Rik's bike they are also sloping numbers. Of course lots of them with the BEF weren't numbered. But especially those with the airborne forces had the sloping number on. Ron
They were certainly numbered, but usually on the front and rear number plate, and/or on the nearside on the black box. embarcation codes, girls names, and divisional and unit signs were also employed, so was gas detection paint, very colourfull!
Cheers,
Lex
email (option): welbike@welbike.net